Skip to content

Your first cast starts here

Fishing for beginners.
One simple step at a time.

Never held a fishing rod? You belong here. Learn what to bring, how to set it up, and what to do when a fish bites—with clear pictures and words you can understand.
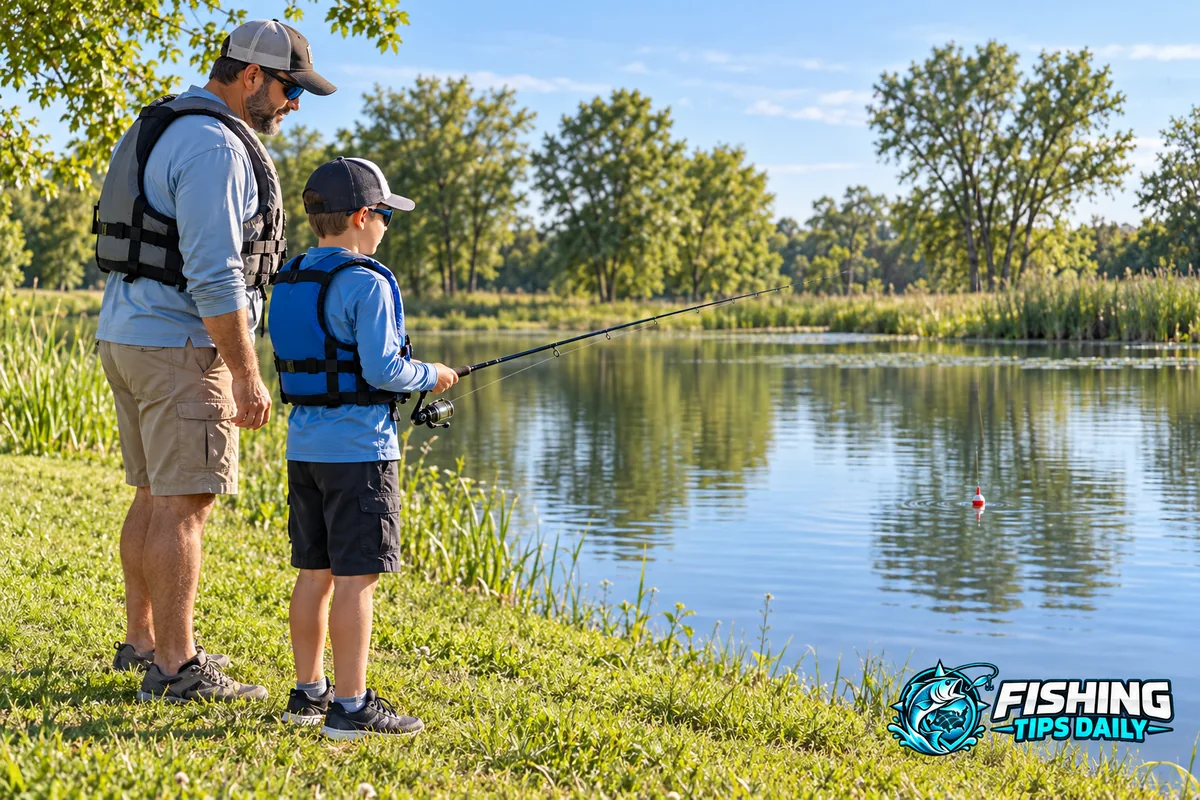
A child and adult, both wearing life jackets, watch a bobber while fishing from a grassy pond bank.
01 / GET READY

Pick a place. Meet your gear.

02 / TRY IT

Tie, rig, cast, and watch.

03 / KEEP LEARNING

Land fish. Solve problems. Try again.

Lesson 01

Your first fishing trip starts here.

You do not need a boat, a box full of lures, or a huge fish. A safe bank, a small hook, and a worm can teach you a lot. We will start with a simple freshwater pond or lake trip, then show you what to try next.

A good first goal

Make a short cast, watch your bobber, and bring your bait back without a tangle. If you catch a fish, that is a bonus. These little skills are how good anglers begin. An angler is simply a person who fishes.

Our example trip

Go with an adult or experienced helper. Pick a public pond with easy access and small fish such as bluegill. Use a light rod, 6-pound monofilament line, a small size 8 hook, a small bobber, one light split shot, and a little worm. Those numbers are a starting example, not a rule for every fish or pond.

Learn one job at a time

First get ready at home. Next practice casting with a hookless practice weight. At the water, work on watching the bobber. Learn landing and release before you catch a fish so you are ready. Saltwater, ice, fast rivers, and large fish need different equipment and plans.

Make it a happy, short visit

Plan about an hour of fishing, plus setup time. Choose comfortable weather and take breaks. A short trip with one new skill is a success. You can come back to the other lessons later.
Back to the lesson list ↑

Lesson 02

Choose a safe, legal place.

Ask an adult to check the rules for the exact water you will visit. Rules can differ between nearby ponds. Take a responsible adult on a child’s first trips.

Check before you pack

  • Permission: Is fishing allowed? Is the bank public, or do you need the owner’s permission?
  • Licenses: Does each angler need a license, permit, or stamp? Age exemptions are not the same everywhere.
  • Tackle: Are worms allowed? Are there special hook rules?
  • Fish: What seasons, lengths, and daily limits apply? Must all fish be released?

Start on a level bank

Choose firm ground with room behind you and an easy place to land a fish. Avoid steep edges, fast current, slippery rocks, and deep mud. Look overhead. Never fish or carry a raised rod near power lines; a rod can conduct electricity. Begin away from busy boat ramps and swimming areas.

Dress for water and weather

Wear a properly fitted, fastened life jacket near the water, especially on docks, steep banks, or boats. Wear shoes, a hat, sunglasses or other eye protection, and sun protection. Bring drinking water. If you hear thunder, stop fishing and get to a substantial building or a hard-topped vehicle.

Give hooks room

Before every cast, look behind you and to both sides. Say “casting” when people are nearby. Store loose hooks in a closed box. Have an adult help with sharp points, pliers, and cutters. If a hook catches a person, stop and get help; do not yank it out. Never swim or climb somewhere dangerous to save tackle.
Back to the lesson list ↑

Lesson 03

Fishing pole or fishing rod? Here is the difference.

People often use “pole” and “rod” to mean the same thing. When choosing gear, it helps to know whether it uses a reel.
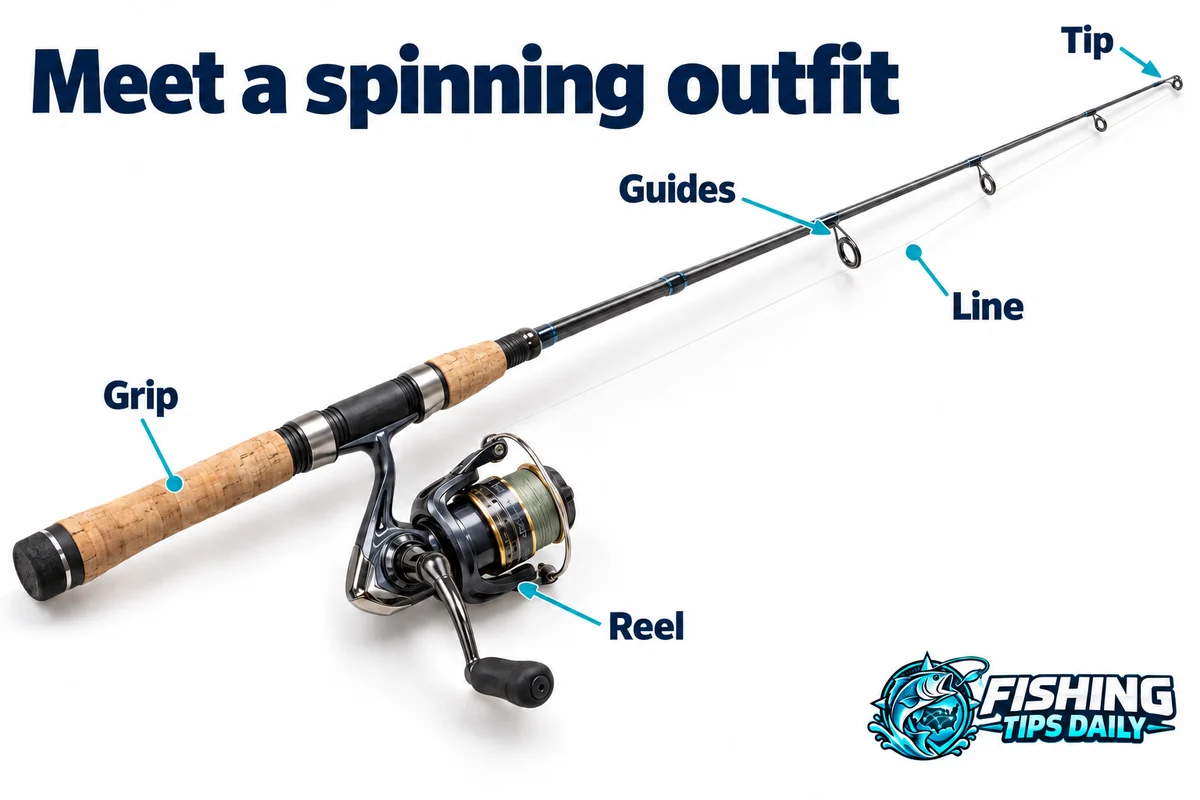
Line runs from the reel through each guide. The grip is where you hold the rod; the tip is its thin, flexible end.View larger image
Line runs from the reel through each guide. The grip is where you hold the rod; the tip is its thin, flexible end.

A simple pole: lower the bait nearby

A cane pole or telescoping fishing pole can have line attached near its tip with no reel. You lower or gently swing the bait into reachable water. It can be a simple way to catch small fish close to a safe bank. The pole’s reach and line length limit where you can fish. Have a helper choose a manageable length and attach the line correctly.

A rod and reel: cast and wind line back

A fishing rod has rings called guides. Line runs from the reel through these rings. The reel stores extra line so you can cast farther and bring it back. This guide uses a rod and reel because it teaches skills you can use in many places.

Choose a size you can comfortably hold

For small freshwater fish, a roughly 5½- to 6½-foot light or medium-light rod is a useful example. A smaller child may find a shorter rod easier. Hold it with the reel attached. Can you hold it steadily without lifting your shoulder or tiring quickly? A very long rod is not better if it is hard to control.

Read the writing on the rod

Length tells you how long it is. Power, such as light or medium, describes how much force it takes to bend it. Action describes where it bends most. A fast-action rod bends mostly toward its tip; a moderate-action rod bends farther down. The printed line and lure-weight ranges tell you what the rod is made to handle. Start with a balanced combination rather than trying to memorize every rating.

One piece, two pieces, or telescoping?

A one-piece rod is ready to use but long to carry. A two-piece rod separates for travel; align the guides and join the sections as the maker directs. A telescoping rod collapses into itself. Keep grit out of the joints and never force a stuck section. Check the joints before fishing.
Back to the lesson list ↑

Lesson 04

Pick a reel you can operate easily.

The reel’s main jobs are to store line, release it for a cast, and wind it back. You do not need the most complicated kind to start.

A closed-face spincast reel uses a button. An open-face spinning reel uses a bail. They belong on rods designed for their reel type.View larger image
A closed-face spincast reel uses a button. An open-face spinning reel uses a bail. They belong on rods designed for their reel type.

Spincast: the push-button choice

A spincast reel has a closed front cover and usually sits above its matching rod. Hold the button to prepare, then release it during the forward cast. Turning the handle engages the pickup. It can be approachable for a new angler. Check the maker’s instructions because controls vary.

Spinning: the open-spool choice

A spinning reel hangs below its matching rod. The spool is the part holding the line. The bail is the curved wire around it. You hold the line with a finger, open the bail, and release the line during the cast. Close the bail by hand afterward. Many spinning reels let you change the handle to the other side.

Baitcasting: useful, but not required now

A baitcasting reel uses a spool that turns during the cast. You control it with your thumb and reel settings. If the spool keeps turning faster than the line leaves, it makes a tangle often called a backlash. Save this extra learning job for later unless you have a patient teacher.

The drag is your pressure control

Drag lets line slip out when a fish pulls hard. It helps prevent a sudden pull from breaking the line. Ask an adult to set it before you start: a firm pull should release line smoothly. Do not tighten it completely. Do not test drag by wrapping line around a hand.

A matched combo makes shopping simpler

A combo is a rod and reel sold together. Check that its line and lure ranges fit the fish and bait you plan to use. Reel numbers such as 1000 or 2500 are size labels that vary among brands. Line capacity and comfortable balance matter more than the number alone.
Back to the lesson list ↑

Lesson 05

Learn your line before you add tackle.

Fishing line is the connection between you and the fish. It must fit the reel, the rod, and the job.

Start with monofilament

Monofilament, often called mono, is one strand of line. It is easy to work with and has some stretch. Around 4–8-pound test can suit many small-fish freshwater setups; our pond example uses 6-pound mono. Check the range on your actual equipment.

A rating is not a lifting promise

“6-pound test” is a line-strength rating. It does not mean you should lift a six-pound fish through the air on that line. Knots, scratches, age, and sudden pulls affect strength. Use a landing net and let the rod and drag help.

Braid and fluorocarbon can wait

Braided line is made from woven fibers and stretches very little. It needs suitable knots and can be hard on bare fingers under tension. Fluorocarbon is another single-strand line, often used as a leader near the bait. You do not need all three types for your first trip. Learn to use one well.

Fill the reel correctly

Ask a shop or experienced adult to put line on the reel according to its instructions. Too much line can spill off in loops; too little can reduce casting distance. Keep gentle tension while winding. Run the line through every rod guide, and check that it is not wrapped around the tip.

Check for damage

Slide your fingers gently along the last few feet of slack line to feel for rough spots. Keep away from the hook. Retie after a snag if the line is scratched. Collect every scrap of discarded line in a closed bag; animals can become tangled in it.
Back to the lesson list ↑

Lesson 06

A starter kit with a job for every item.

Borrowing good, working gear is fine. Ask whether your local park, library, or fishing program lends tackle. Buy for your real first trip, not every possible future trip.

The fishing essentials

  • One matched rod and reel: comfortable to hold and suitable for small fish.
  • Suitable monofilament: within the rod and reel’s range.
  • A few small hooks: for example, size 8 for our bluegill-and-worm setup.
  • Small fixed bobbers: enough buoyancy for the bait and weight.
  • Light split shot: small pinch-on weights, preferably non-lead where practical.
  • Legal bait: a small container of worms for our example.

Prefer to start with a fishing kit?

A rod-and-reel kit can make shopping simpler by bundling several items together. Browse our Complete Fishing Kits to compare the included gear, prices, and star ratings. For this first trip, look for an easy-to-use spinning or spincast setup suited to small fish.

Check the contents against the essentials above: some options include only a rod and reel, while others add line, lures, or a carrying case. You may still need small hooks, bobbers, split shot, and bait for the bluegill setup in this guide.

The helpful tools

Pack needle-nose pliers or forceps, line clippers, a soft rubber-mesh net, a small tackle box, and a bag for litter. An adult should handle cutters and pinch-on weights. Never bite line or weights. Wash hands before eating after handling bait and tackle.

What you can skip for now

You do not need a boat, fish finder, five rods, a huge lure collection, or a special fishing outfit. A spare bobber and a few extra hooks are more useful on this trip than an advanced reel you cannot yet operate.

What changes for bigger fish?

Thick weeds, strong current, heavy sinkers, and larger fish may require stronger tackle. Do not turn the little bluegill outfit into a heavy catfish outfit just by tying on a giant hook. Match the whole system: rod, reel, line, hook, weight, and bait.
Back to the lesson list ↑

Lesson 07

Pack once. Check before you go.

Tap the boxes as you pack. They stay checked while this page is open. Print the checklist if you want to take it with you.

Ready-to-go checklist

Back to the lesson list ↑

Lesson 08

Small fish need small bites.

Imagine trying to eat an apple bigger than your head. Fish have the same problem with oversized bait. A little piece can work better than a whole worm.
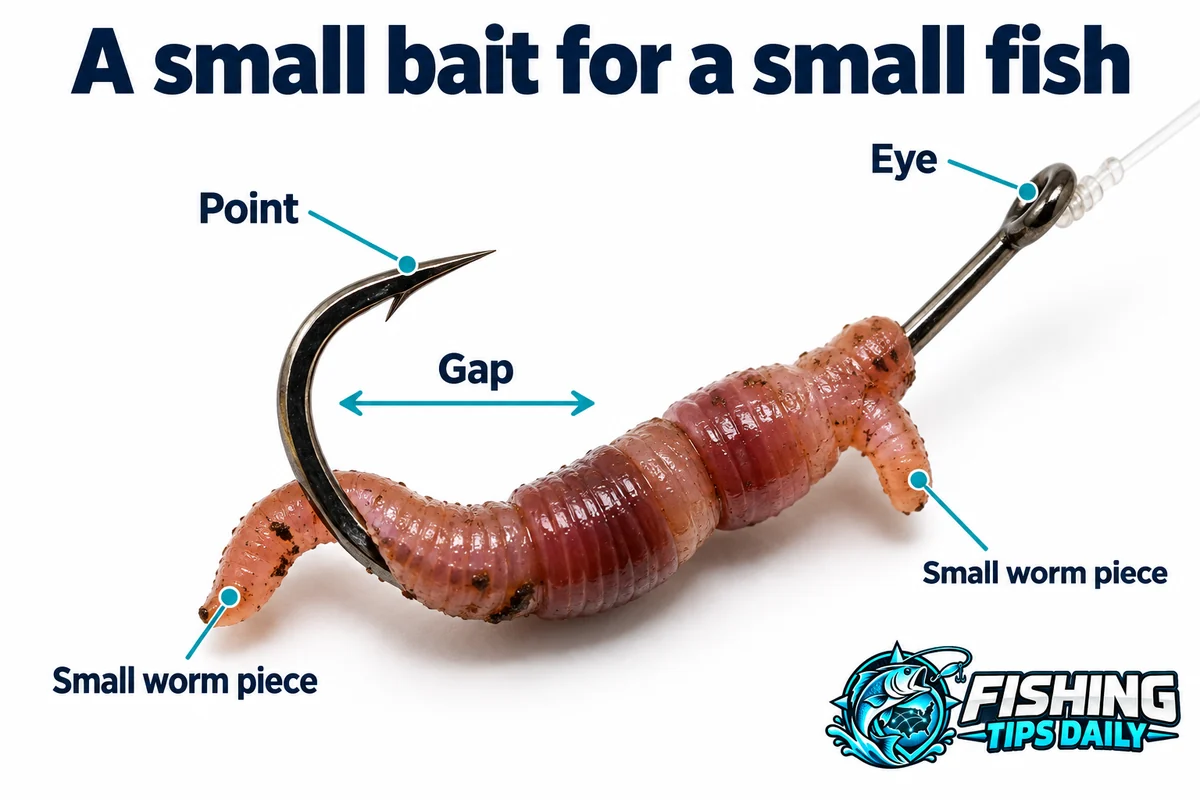
The sharp point and open gap need room to work. A small worm piece can be easier for a bluegill to take than a whole nightcrawler.View larger image
The sharp point and open gap need room to work. A small worm piece can be easier for a bluegill to take than a whole nightcrawler.

Understand hook sizes

For common numbered hooks, a size 10 is generally smaller than a size 8, and a size 8 is smaller than a size 6. After size 1, “aught” sizes get larger: 2/0 is generally bigger than 1/0. Brands and shapes vary. For our bluegill example, start with a small size 8 baitholder or similar J-shaped hook.

Thread on a short worm piece

Ask an adult to help put the worm on the hook in two or three places. Leave a little end free to move. Keep the point and the open space under it usable. Do not cover the whole hook in a big ball of bait. If fish steal the ends, shorten the worm.

Use the smallest float that works

A float, or bobber, holds the bait up and helps you spot bites. A huge bobber can make small bites hard to see. A split shot helps the bait sink below the float. Use just enough weight for control, without sinking the bobber.

Keep bait cool and contained

Keep worms shaded and in their bedding. Close the container. Use only bait allowed at that water. Never release leftover live bait or dump its water into the lake. Take it home or dispose of it as local rules require.

Bait versus lure

Natural bait is something fish can eat, such as a worm. An artificial lure is an object made to attract fish by its shape or movement. The worm-and-bobber setup lets you practice watching and timing. A lure adds another task: making it move well. Learn one setup first.
Back to the lesson list ↑

Lesson 09

Learn one strong knot, then a second.

A knot joins your line to a hook or lure. Practice with thick cord and a large closed ring first. You can see the loops easily without a sharp hook. Have an adult help when you switch to fishing line.
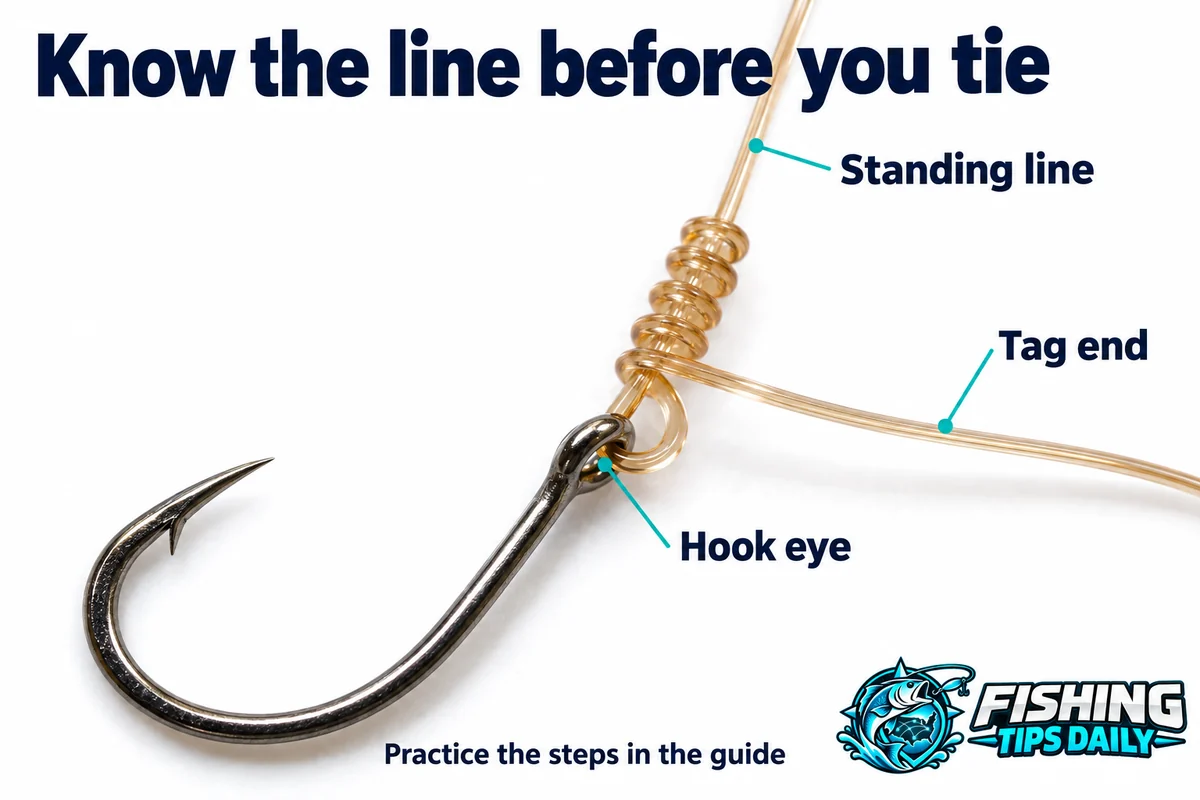
Identify the long standing line, short tag end, and metal hook eye. This close-up shows a knot in progress; follow the written steps to finish and test it.View larger image
Identify the long standing line, short tag end, and metal hook eye. This close-up shows a knot in progress; follow the written steps to finish and test it.

Learn these two names

The standing line is the long part going back to the rod. The tag end is the short loose end used for tying. Wet the line with clean water before the final tightening. Pull slowly so the wraps settle neatly. Test each knot with the hook held safely by a tool, not by its point.

Improved clinch knot: our mono starting knot

  1. Pass the tag end through the hook eye. Pull through about six inches.
  2. Wrap the tag end around the standing line five times. Leave the little loop beside the hook eye open.
  3. Put the tag end through that small loop beside the eye. This creates a larger loop above it.
  4. Bring the tag end back through the new larger loop.
  5. Wet the line. Hold the tag gently and pull the standing line slowly until the wraps sit neatly against the eye.
  6. Have an adult test the knot. Trim the extra tag, leaving about ⅛ inch. Retie a knot that slips or looks untidy.

Palomar knot: another useful connection

  1. Double about six inches of line to make a loop. Pass the doubled end through the eye. If the eye is small, pass a single end through, then back through to form the doubled section.
  2. With the doubled line, tie a loose overhand knot above the hook. Keep it loose; the hook hangs below.
  3. Pass the entire hook through the end loop.
  4. Move that loop above the hook eye. Keep the strands beside each other instead of crossed.
  5. Wet the knot and pull both line ends carefully to seat it. Test it, then trim the tag.

Choose the knot for the line

Our first rig uses light monofilament. The improved clinch is a familiar starting knot for that job. A Palomar is useful for many line types, but line makers may recommend a particular knot or variation. Do not assume a knot used on mono will hold equally well on slick braid.

Retie when the line is hurt

Check after a snag or a fish. Rough line, a bent eye, crossed wraps, and a slipping knot are reasons to stop and fix the connection. A careful knot is more useful than a fancy knot tied badly.
Back to the lesson list ↑

Lesson 10

Build your first bobber rig.

A rig is the way you arrange the hook, weight, and other tackle on your line. This fixed-bobber rig holds a little worm at a chosen depth.
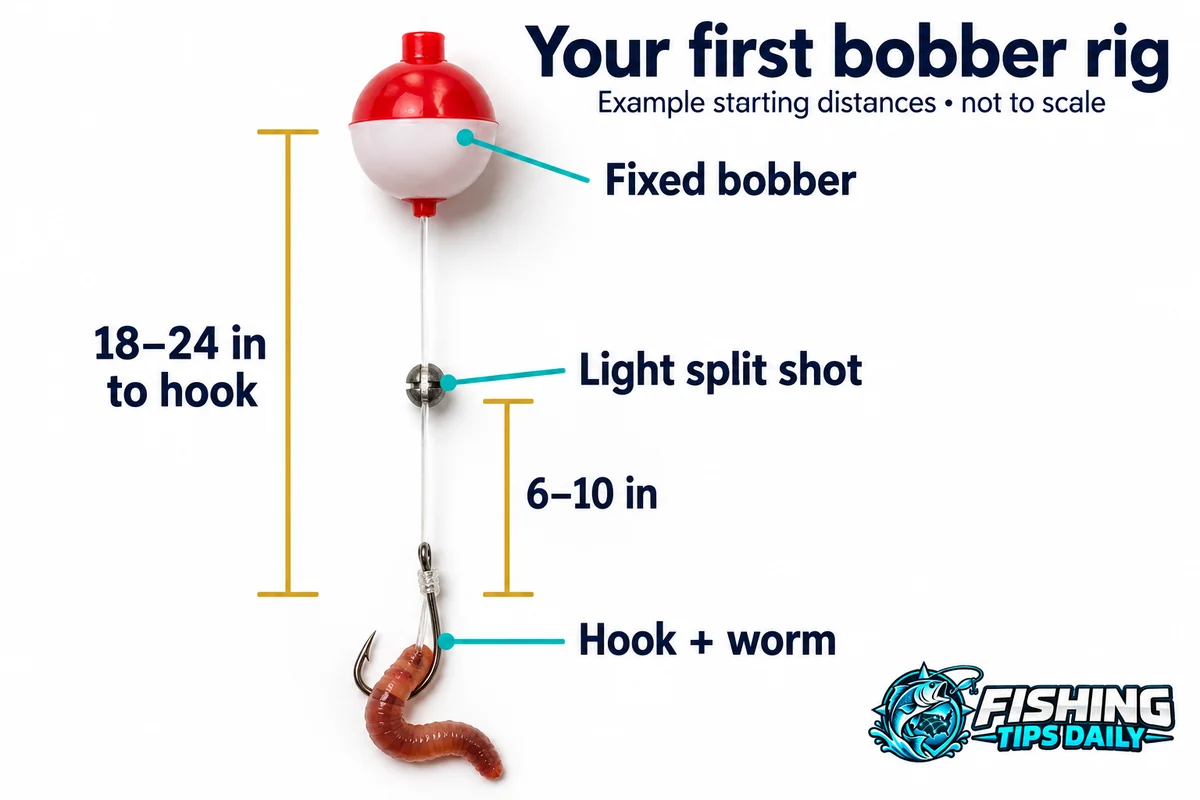
Measure bait depth from the bobber to the hook. The sample distances are a starting point, not a rule for every pond.View larger image
Measure bait depth from the bobber to the hook. The sample distances are a starting point, not a rule for every pond.

Build from the hook upward

  1. Run line through every rod guide, starting nearest the reel. Leave enough beyond the tip to work.
  2. Tie on the small hook and test the knot.
  3. Have an adult attach one light split shot about 6–10 inches above the hook. Pinch gently with the right tool; crushing the line can damage it.
  4. Clip a small fixed bobber about 18–24 inches above the hook for a first try in shallow water. Follow the bobber’s attachment instructions.
  5. Add a small worm piece at the water. Lower the rig beside the bank to check that the float supports the weight and bait.

Check before casting

If the float sinks without a bite, remove some weight or use a slightly more buoyant float. If it lies flat, check the attachment and whether the weight is hanging freely. A giant float can hide little bites, so use the smallest one that does the job.

Why a fixed bobber first?

It is easy to see and easy to adjust. But a very long length of line below a fixed bobber is hard to cast. A slip float lets the line slide through it until it reaches a stop, which helps with deeper fishing. Learn that after you can comfortably use the simple fixed setup.
Back to the lesson list ↑

Lesson 11

Move the bobber to move the bait.

Depth means how far something is below the surface. Fish may be near the top, halfway down, or close to bottom. Your bobber helps you try different depths.
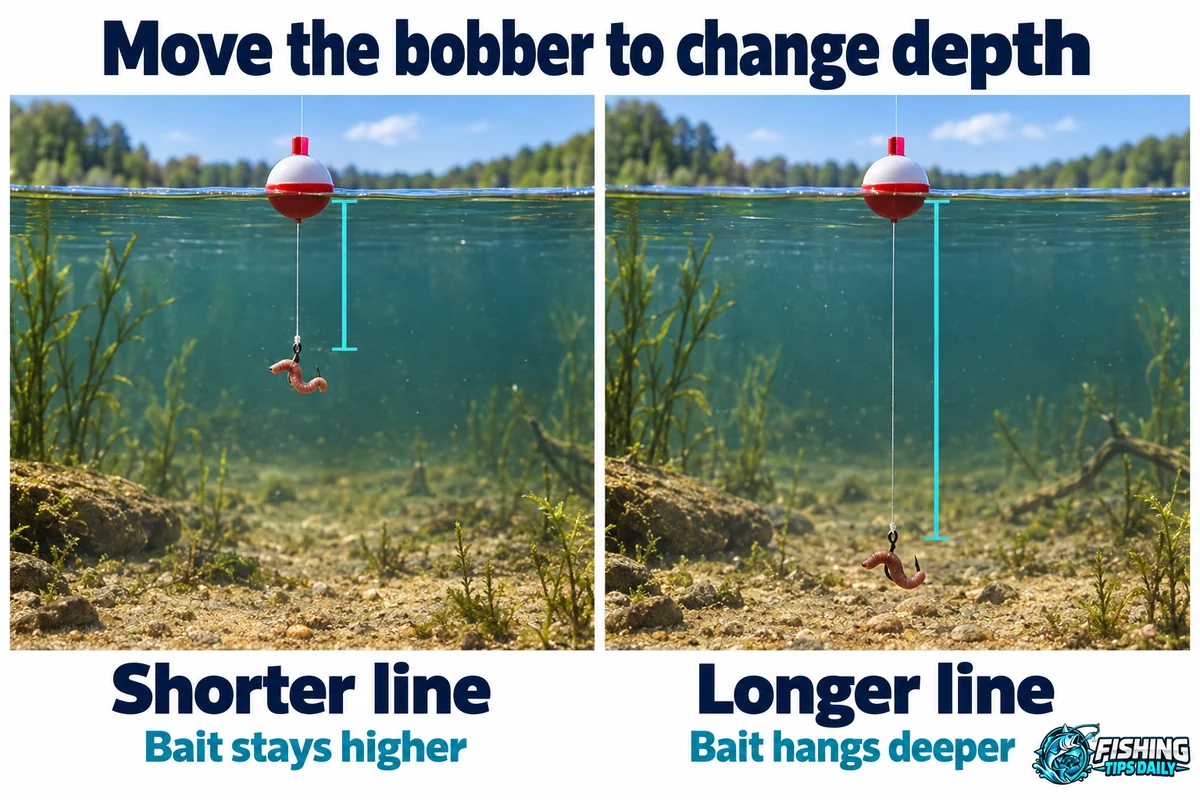
More line between bobber and hook lets the bait hang deeper. Shorten the distance to lift it above weeds.View larger image
More line between bobber and hook lets the bait hang deeper. Shorten the distance to lift it above weeds.

Farther from the hook means deeper

Move the bobber farther up the line, away from the hook, to let the bait hang deeper. Move it closer to the hook for shallower bait. Check that moving a clip has not scratched the line.

A three-foot pond example

If the water is about three feet deep, try the hook about two feet below the float. That may keep it above bottom. If the hook brings back weeds, shorten the hanging distance. If there are no bites, try a slightly deeper setting in a clear opening. Change only a few inches at a time.

Read the clues carefully

A float falling over can mean the weight is resting on bottom. Wind, too little weight, or a wrong attachment can also cause trouble. Lift the rig clear and check it. Do not fix every float problem by adding a bigger sinker.
Back to the lesson list ↑

Lesson 12

Look for food, shade, and hiding places.

Fish do not spread out evenly like sprinkles on a cake. A few small areas can hold most of the fish you can reach. Walk and look before casting.
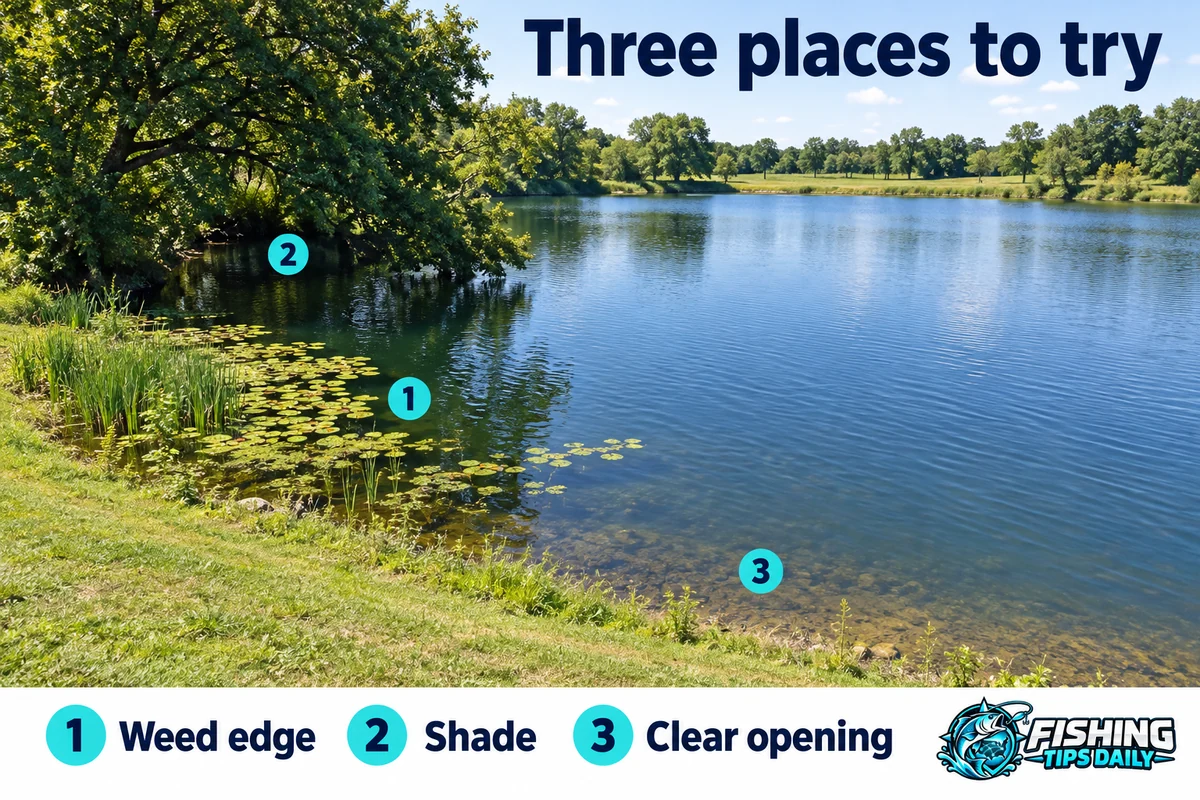
Look for open water beside weeds, shade, and a clear bank. The numbered pond scene shows places to investigate, not guaranteed fish locations.View larger image
Look for open water beside weeds, shade, and a clear bank. The numbered pond scene shows places to investigate, not guaranteed fish locations.

Start beside an edge

An edge is where something changes: weeds end, shade meets sun, or shallow water drops deeper. Fish often use cover such as plants or wood. Try the open water beside cover before casting into it. You can learn without spending the trip snagged in branches.

Keep the first casts close

Fish may be only a few feet from the bank. Stand back a little and move quietly. A long cast is not automatically better; it can send your bait past the fish and make bites harder to see.

Try three small spots

Fish one weed edge, one patch of shade, and one clear opening. Check your bait and depth as you go. If you catch a bluegill, cast nearby again. Several fish may be using the same place.

Pick somewhere you can land a fish

A safe, open bank is better than a promising-looking spot beyond a fence or over a steep wall. If you cannot safely return a fish to the water there, choose another place. Skip wading and fast current on your first trip.
Back to the lesson list ↑

Lesson 13

Practice a short, gentle cast.

Practice on land first with a hookless casting plug. Keep people, pets, and obstacles out of the area. A bucket or hoop makes a good target. Accuracy comes before distance.
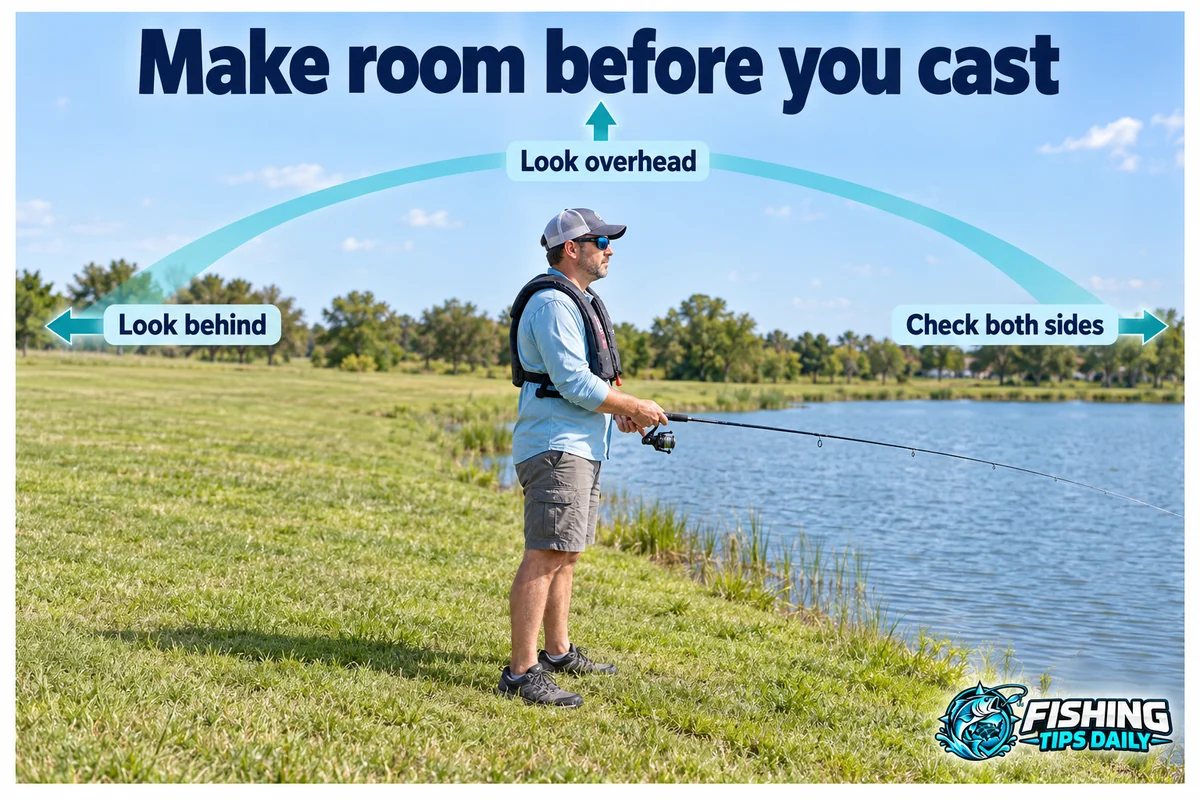
Check the full casting area, including behind you and overhead. Stop if a person or pet enters it.View larger image
Check the full casting area, including behind you and overhead. Stop if a person or pet enters it.

Set the hanging length

Start with the practice plug roughly 6–12 inches below the tip, or use the distance your instructor recommends for that rod. At the pond, keep the bobber below the tip and the dangling hook clear of people. Never reel a hook, float, or weight into the tip guide.

With a spinning reel

  1. Hold the rod with the reel underneath. Catch the line against the rod with your index finger.
  2. Open the bail with your other hand. Keep holding the line so the rig does not drop.
  3. Look behind, beside, and above you. When clear, move the rod back smoothly, then forward toward the target.
  4. Lift your finger during the forward motion to release the line. Learn the timing with the hookless plug.
  5. After the rig lands, close the bail by hand. Reel gently to remove loose line without dragging the bobber away.

With a spincast reel

Hold the button down before the cast. Keep it pressed as you move back. Release during the forward motion so line can leave. After the rig lands, turn the handle to engage the reel. Check the instructions for your particular reel.

Fix timing with a slower motion

If the plug shoots steeply upward, you probably released too early. If it hits the ground right in front, you probably released too late. Slow down and practice. Do not swing harder to fix timing. Lob a bait-and-bobber rig gently so the worm stays on.
Back to the lesson list ↑

Lesson 14

What does a bite look like?

Once the bobber settles, watch it. Keep enough slack for the bait to hang naturally, but not a huge loose loop of line. Stay with your rod.
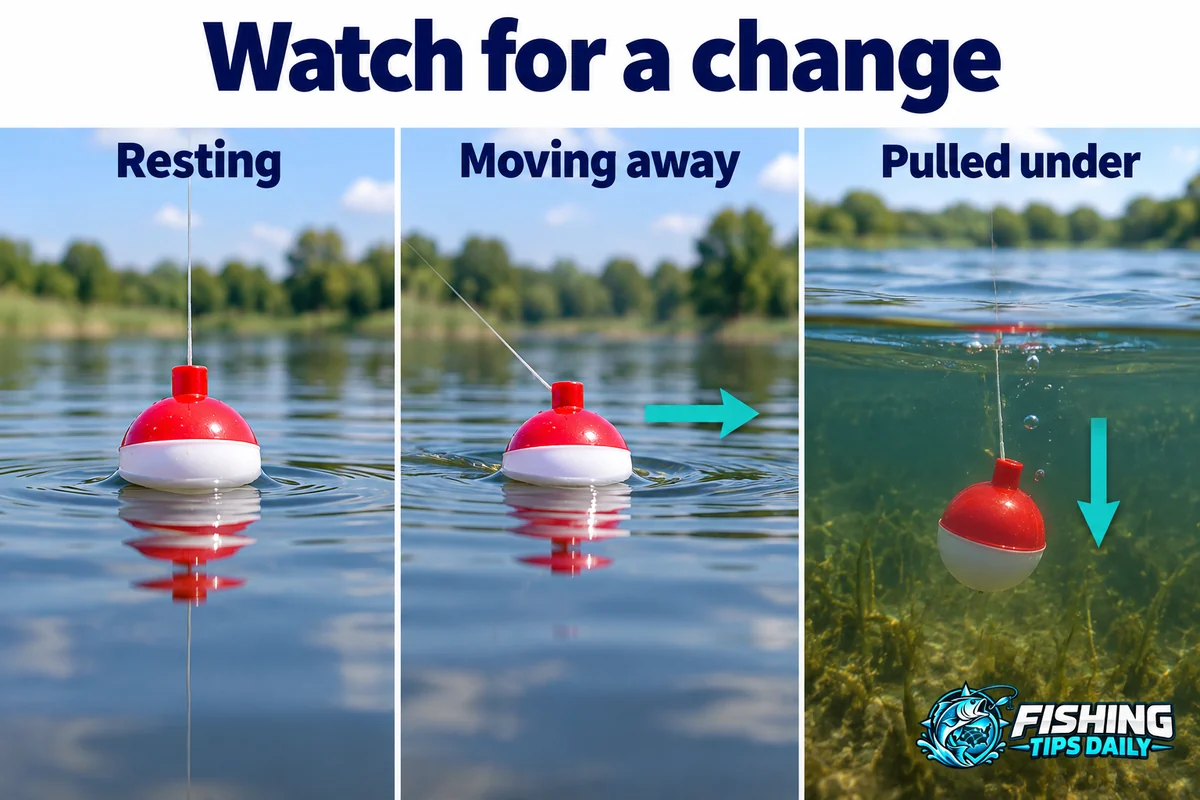
Learn the resting float first. A steady sideways movement or sustained pull under can signal a bite.View larger image
Learn the resting float first. A steady sideways movement or sustained pull under can signal a bite.

A wiggle is a clue

Wind and waves can rock a float. A fish may tap it, pull it sideways, lift it, or take it under. Compare its motion with the waves. A float traveling steadily against the normal wave pattern is worth attention.

For our small J-shaped hook

When the bobber moves away steadily or goes under and keeps moving, reel in loose line and lift the rod firmly but gently. This is setting the hook. Do not wait a long time for the fish to swallow the bait. Do not swing the rod hard over your shoulder.

If you miss the fish

Bring the rig back carefully. Check the bait, hook, and line. Shorten the worm if fish keep stealing the ends. Try nearby again. Missing bites is normal while you learn.

Circle hooks need a different response

Circle hooks have points that curve inward. With those, you usually reel steadily and let the line tighten instead of making a sharp hookset. Our first bobber lesson uses a small J-shaped hook so the steps stay clear.
Back to the lesson list ↑

Lesson 15

You have a fish. Stay calm.

Keep your feet still and guide the fish toward your safe landing place. Do not run backward or drag it up the bank.
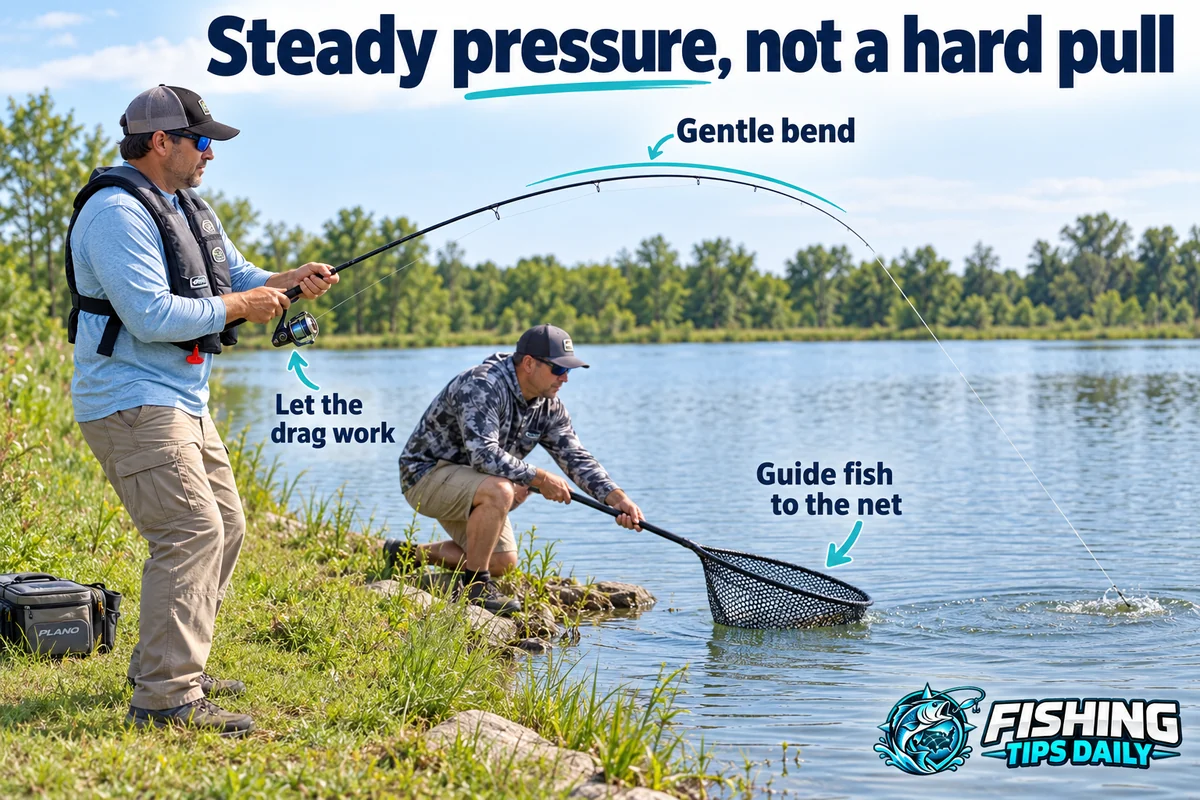
A comfortable bend cushions the pull. Bring the fish to a net rather than lifting it with the rod.View larger image
A comfortable bend cushions the pull. Bring the fish to a net rather than lifting it with the rod.

Let the rod and drag help

Keep a moderate bend in the rod. Do not point it straight up and fold the tip sharply backward. When the fish pulls hard and the drag releases line, let it run briefly. Stop cranking against a slipping drag. When the pull eases, reel again.

Keep gentle tension

If the fish swims toward you, reel to take up slack. If it heads toward branches, use steady pressure to guide it, not wild jerks. Never wrap line around your hand. Line under tension can cut skin.

Bring the fish to the net

Ask a helper to put a soft-mesh net in the water. Guide the fish over it headfirst, then lift once it is inside. Do not chase the fish with the net. Do not use the rod like a crane to lift a heavy fish through the air.

Ask how to hold this fish

Bluegill and catfish can have sharp fin spines, and some fish have teeth. An experienced adult should show you how to handle the species you caught. Do not copy a bass lip grip on every fish. Keep fingers out of eyes and gills.
Back to the lesson list ↑

Lesson 16

Give the fish a gentle trip home.

Decide before fishing whether you plan to release your catch. Have the net and pliers ready so the fish is not waiting while you search through bags.

Wet hands and a supported body

Wet your hands before touching a fish. Keep it in the water while you get ready. Support its body gently; do not squeeze. Keep it off dirt, hot pavement, and towels. Take a quick photo only if it will not delay release.

Let an adult remove the hook

For an easy mouth-hooked fish, a helper can use pliers or forceps to back the hook out along its entry path. If the hook is deep, do not dig or pull hard. An experienced adult can cut the line close when that is the appropriate release choice. Follow any special advice for the species and water.

Lower it into the same water

Return the fish gently where you caught it. Hold it upright if it needs a moment, facing gentle current when present. Let it swim away when ready. Do not toss it or drag it backward through the water. Do not move fish to another pond.

If you plan to keep fish

An adult should identify the fish, check the keeping rules, and check eating advisories for the water. Plan proper humane handling and cold storage before the trip. Do not keep fish just to see how long they last in a bucket. If you cannot identify it, get help before making a keeping decision.
Back to the lesson list ↑

Lesson 17

No bites? Change one small thing.

Fishing is a series of small experiments. You can do everything carefully and still have a quiet day. Use the clues you can see.

Try this order

  1. Bait: Is it still on the hook? Can a small fish fit it in its mouth?
  2. Hook: Is the point clear, or hidden by weeds or too much bait?
  3. Depth: Is the bait dragging? Try a little shallower or deeper.
  4. Spot: Try a different edge or another safe opening.
  5. Conditions: Heat, cold, bright sun, muddy water, and weather changes can move feeding fish.

Try a useful experiment

Suppose fish peck at a whole worm but you cannot hook one. Shorten the worm first. Keep the same spot and depth. If you catch one, you learned about bait size. If you change everything together, you will not know what helped.

Write down one clue

Try “Small bites beside shady weeds, about two feet down.” A quiet-day note helps too: “No bites in the sunny opening; hook kept collecting weeds.” That is more useful than deciding fish never bite there.
Back to the lesson list ↑

Lesson 18

Fix common beginner problems.

Set the rod somewhere secure before untangling line. Get adult help with hooks, weights, and stuck tackle.

Line will not leave the reel

Check the spinning reel’s bail and whether your finger has released the line. On a spincast reel, check button timing. Look for line wrapped around the tip. Do not force a harder cast.

A loose loop jumps off the spool

Stop reeling. Open the bail and gently pull loose line out while a helper keeps the hook safe. Straighten the loop, close the bail by hand, then reel under light tension. If the spool is overfilled or the line badly twisted, get help adjusting or replacing it.

The hook is stuck

Stop pulling hard. If the ground is safe, try a gentle pull from a different angle. Keep everyone away from the direction a freed hook could fly. Ask an adult when to cut the line. Never wrap it around skin or wade out to save the tackle.

Bait flies off

Use a smaller piece, thread it securely, and cast with a smooth lob. Whipping casts tear soft bait. Check that the total bait-and-weight setup suits the rod’s printed casting range.

The float keeps blowing into weeds

Try a sheltered bank or a shorter cast into clear water. Take up loose line gently. If you cannot control the rig, change the spot or return on a calmer day. More weight is not always the answer.

Fish keep coming off

Maintain a gentle bend instead of letting the line fall slack. Do not yank. Check for a bent hook or a point buried in bait. Some fish will escape even when you do things correctly.
Back to the lesson list ↑

Lesson 19

Try your first artificial lure.

A retrieve is how you bring a lure through the water. Choose a small lure that fits your rod’s weight range. Start in clear, open water where you can watch it move.
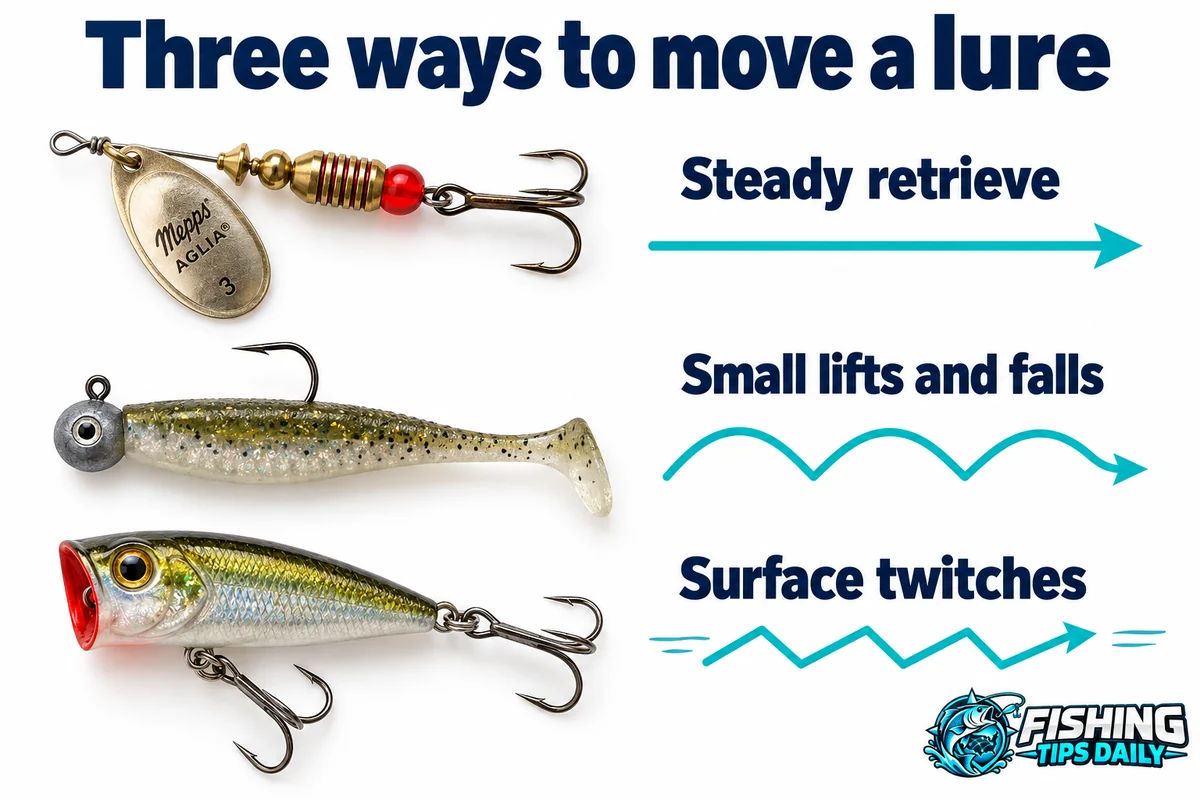
These are example lure paths: steady swimming, small lift-and-fall movements, and surface twitches. They are not exact depth predictions.View larger image
These are example lure paths: steady swimming, small lift-and-fall movements, and surface twitches. They are not exact depth predictions.

Inline spinner: make the blade turn

An inline spinner has a blade that rotates around a straight wire. Cast, let it sink a little, then reel just fast enough for the blade to work. Watch it near the bank. Too slow may stop the blade. Faster is not always better. Keep multi-point hooks away from hands.

Small jig: swim it slowly

A jig has a weighted hook, often with a little soft body. Cast, let it sink briefly, then reel slowly with the tip controlled. Try above weeds instead of dragging through them. Depth depends on weight, sink time, line, current, and speed, so watch what happens.

Topwater: work at the surface

Some surface lures pop when twitched; others swim or zigzag. If a fish splashes at one, wait until you feel its weight before lifting. A splash alone does not mean the fish has the hook. Practice the particular lure’s action beside the bank.

Keep the choices simple

You do not need every color. Learn where one lure runs, how it moves, and how to keep it out of snags. If your worm and bobber are working, you do not have to change. Bait fishing is a skill too. Explore the bait and lure guide.
Back to the lesson list ↑

Lesson 20

Choose your next fish.

Try a fish that lives in water you can safely reach. A popular fish is not automatically the easiest first target in your area.

Bluegill and other sunfish

A tiny worm piece near weeds or shade is a useful start when these small fish are present and feeding. Use a hook and bait that fit their mouths. Meet the bluegill.

Crappie

Try a little jig beside brush or docks you can legally fish. A float can hold it at a repeatable depth. Repeat a cast that catches a fish; others may be nearby. Minnows are another option where allowed, but need more care than worms. Learn crappie fishing.

Bass

A suitable small soft plastic or spinner can be a next step around open cover. Match the outfit to the lure and cover rather than using the bluegill rig for every job. Learn bass fishing.

Trout

A stocked lake can be approachable when trout are present. Try a small spinner or permitted bait. Some trout waters allow only certain tackle. Check the exact water’s rules before you rig up. Learn trout fishing.

Catfish

A worm or permitted fresh cut bait near bottom can work for channel cats. Use a bottom setup suited to the water and fish. Ask about safe handling of fin spines, and keep raw bait away from snacks. Learn catfish fishing.

Walleye

Walleyes can need more depth control than a first shallow-pond trip. Learn a jig or float presentation with someone who knows the water. Learn walleye fishing.
Back to the lesson list ↑

Lesson 21

A plan for your first hour.

This is a flexible plan, not a stopwatch challenge. Stop for weather, comfort, or safety whenever needed.

Minutes 0–10: look and prepare

Check signs, weather, the bank, and your casting space. Put on life jackets. Choose a landing spot. Inspect the knot and line. Lower the baited rig nearby to check that the bobber works.

Minutes 10–25: make short casts

Fish one reachable edge. Watch how a resting bobber behaves. Bring the rig back to check bait and weeds. Practice calm casts and smooth retrieves.

Minutes 25–40: make one change

Try a slightly different depth if there are no bites. Then try another safe spot if needed. If little fish steal the bait, shorten the worm. Remember which thing you changed.

Minutes 40–50: repeat what helped

Go back to the best depth or spot. Work through landing and release with your helper if you catch one. Otherwise, practice placing the bait beside a clear target. That is progress too.

Minutes 50–60: finish well

Secure the hook before walking. Pick up line and litter. Put unused bait away, wash hands, and record one lesson. Leave the bank cleaner than you found it.
Back to the lesson list ↑

Lesson 22

Look after your gear for next time.

A few minutes at home prevent many problems on the next trip. Ask an adult to help with sharp or moving parts.

Make the rod safe to carry

Use the rod’s hook keeper if it has one, or remove and store the hook safely. Do not hook it through a guide’s smooth inner ring. Keep the tip away from doors, car windows, and people. Breaking a rod in a car door is easier than breaking it on a fish.

Clean gently and dry

Wipe dirt from the rod and reel. Follow the maker’s cleaning directions; do not dunk the reel or blast it with high-pressure water. After saltwater use, gear needs particular rinsing and care. Let damp tackle dry before closing the box.

Inspect and store

Check guides for damage, hooks for rust, and line for roughness. Have an adult safely replace bad hooks and damaged line. Store gear out of heat and direct sun. Follow the reel maker’s advice for lubrication and storage instead of adding random oils.

Restock only what you used

Replace a lost bobber or used hooks. Keep a small note of the gear that worked. Knowing your few useful items is better than carrying a box you cannot organize.
Back to the lesson list ↑

Lesson 23

Fishing words in plain English.

Come back here when a new word appears. You do not have to memorize the whole list.

Your small fishing dictionary

Angler
A person who fishes.
Bait
An offering used to attract a fish, often something it can eat.
Lure
An artificial object made to attract fish.
Cast
Send your bait or lure out with the rod.
Retrieve
Bring the line and lure back in.
Rig
The arrangement of hook, line, float, and weight.
Cover
Things fish can hide beside, such as plants, wood, and docks.
Structure
The shape of the bottom, such as a slope or drop-off.
Slack
Loose line that is not pulling tight.
Tension
A pull along the line.
Drag
The reel system that lets line slip out under a strong pull.
Hookset
The action that helps the hook take hold.
Leader
A separate length of line near the bait or lure.
Snag
A hook caught on something other than a fish.
Tag end
The short loose end of line used to tie a knot.
Bag limit
The allowed number of fish under a particular rule; check exactly how it applies.
Back to the lesson list ↑

A little more help

Questions new anglers ask.

Do I need an expensive rod?

No. A working outfit that fits your hands and your fishing job is enough. Borrowing a suitable setup can help you learn what you like before buying.

Is a pole easier than a rod and reel?

A simple pole without a reel can be easy for fishing within its reach. A rod and reel lets you cast and manage more line. Choose what fits the place and the person using it.

Which knot should I learn first?

For this light-monofilament setup, begin with the improved clinch. Practice slowly and test every knot. Learn the Palomar next. Use knot advice suited to your particular line.

How far should I cast?

Start close enough to see the bobber and control the line. A short cast beside useful cover can be better than a long cast into empty water.

How long should I wait in one place?

There is no magic time. Make several careful casts, check bait, and try a depth change. Move to another safe opening when you have no useful signs.

Can I fish without touching a worm?

Yes. Ask a helper to bait your hook or learn with a permitted prepared bait or suitable lure. Each has its own setup and movement.

Can a child go alone?

For this beginner plan, fish with a responsible adult. Water, hooks, weather, and unfamiliar places are easier to manage with help. Follow family and location rules.

What if I catch nothing?

You can still learn a knot, make accurate casts, watch a float, and find a safe place. Keep one useful note and try again.

You do not have to learn it all today.

Choose one safe place, one simple setup, and one skill to practice. The next good trip starts with a small step.

✉Join the Fishing Tips Daily newsletter waiting list

Our newsletter is not sending yet. Leave your email if you would like to hear from us when it launches.

By joining, you agree to receive our newsletter when it launches. To request removal before then, contact us. Read our privacy policy.